
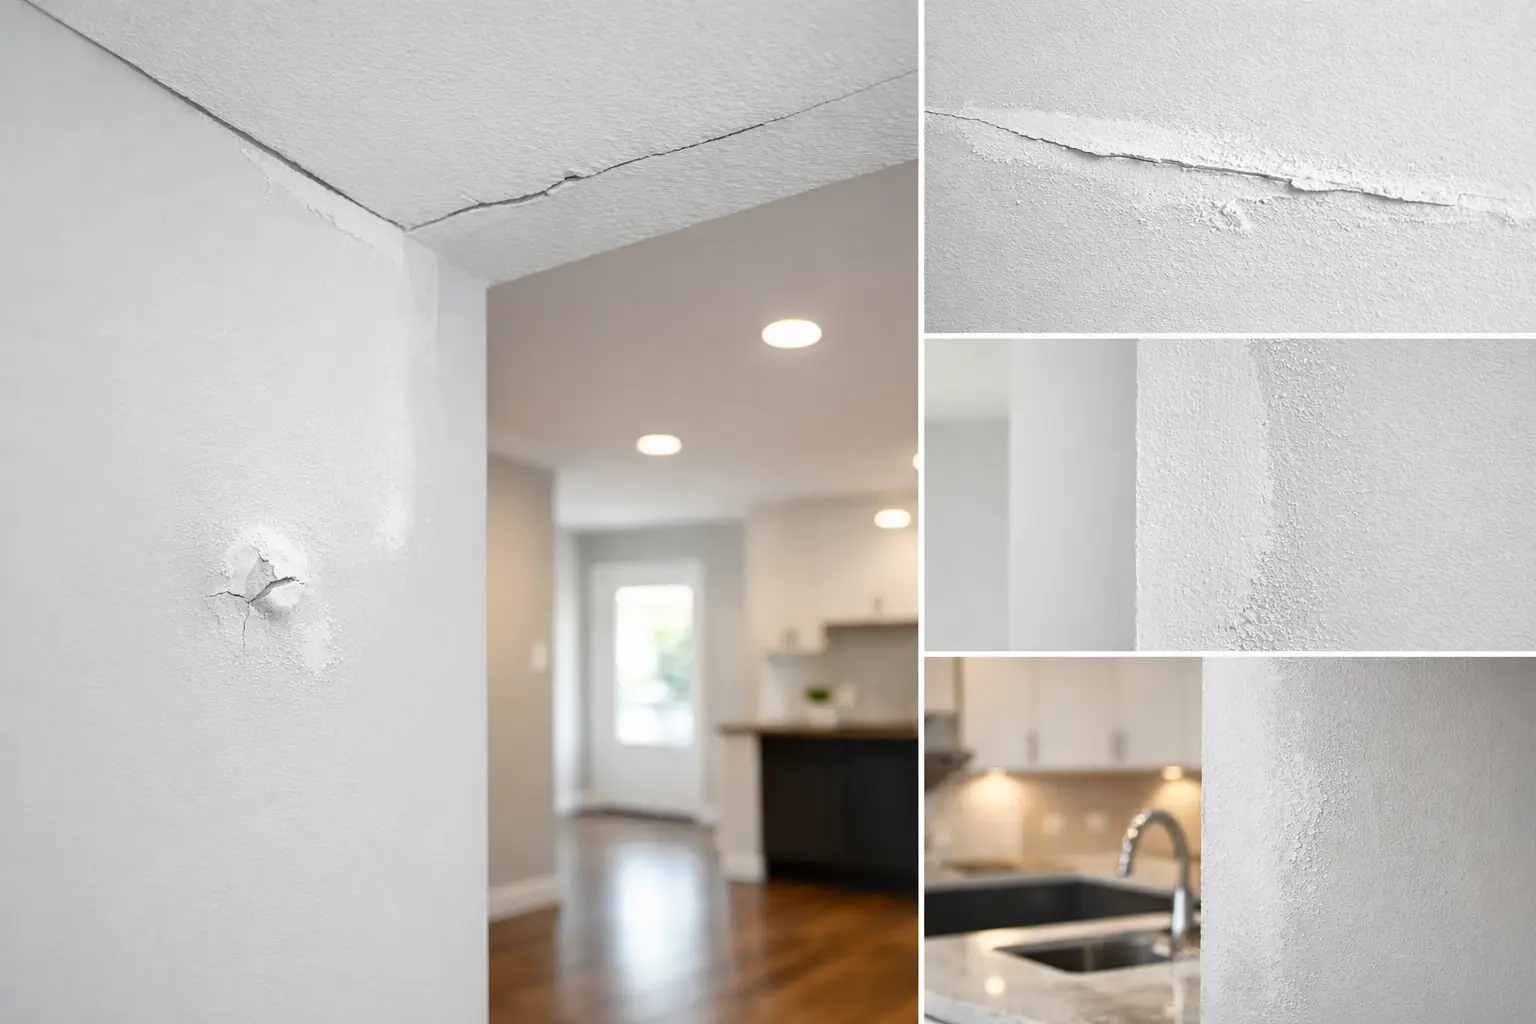
A wall can look acceptable while the room is empty, then show every flaw once daylight, pot lights, or a fresh coat of paint hits it. Knowing the signs of poor drywall finishing helps homeowners, builders, and property managers decide whether a surface needs attention before the painter arrives or before a renovation is considered complete.
Drywall finishing is the work that makes installed board look like a continuous wall or ceiling. It includes taping joints, applying compound, covering fasteners, building out corners, sanding, and preparing the surface for primer and paint. Small imperfections are normal during the work, but they should not remain visible in the final paint-ready finish.
Visible seams and raised tape
The most familiar problem is a joint line that remains visible through paint. You may see a straight ridge across a wall, a slightly raised band at a ceiling joint, or a line that appears only at certain angles. This usually means the joint was not feathered wide enough, the compound was applied unevenly, or the surface was not sanded flat between coats.
Tape that is lifting, bubbling, or separating is a more serious version of the same issue. A loose edge can catch the eye now and may continue to peel if it is painted over. It needs to be cut back and repaired properly rather than hidden with another coat of paint.
Not every line is a finishing failure. A crack that follows a joint can sometimes be related to seasonal movement or changes in the building. The practical question is whether the tape itself is secure and whether the surface can be restored to a smooth, stable finish.
Signs of poor drywall finishing under light
Light reveals drywall work better than almost anything else. A ceiling light placed close to a wall, a large window, or low-angle evening sun can expose imperfections that are hard to notice under general room lighting.
Broad bands beside joints
If a wall shows long, shallow bands on either side of a seam, the joint compound may not have been feathered far enough into the surrounding board. Drywall compound must taper gradually from the joint to the face of the board. When that transition is too abrupt, paint reflects light differently across the area and makes the repair or seam stand out.
Ripples, waves, and uneven planes
A finished wall should read as one flat surface. Ripples can look like soft shadows running across the drywall, especially beside windows or along a hallway wall. On ceilings, they can become very noticeable when lights are installed close to the surface.
Some walls in older homes are not perfectly straight, and drywall cannot always correct every framing variation without additional work. Even so, a good finish should avoid adding obvious waves, humps, or abrupt changes at joints and patches.
Sanding scratches and swirl marks
Fine sanding marks may disappear after primer, but deep scratches, circular swirls, and rough patches often show through paint. These are especially visible with eggshell, satin, and other finishes that reflect more light than flat paint.
A wall that feels smooth to the hand can still show sanding damage under side lighting. This is why drywall finishing is checked both by touch and by looking across the surface from different angles before it is ready for paint.
Corners that look uneven or fragile
Outside corners around hallways, windows, bulkheads, and openings should be straight, smooth, and firmly attached. A wavy corner, a visible metal edge, chipped compound, or a corner that feels loose points to incomplete finishing or damage.
Inside corners should also look clean. Cracked tape in a corner, thick built-up compound, or a visibly crooked line can make an otherwise finished room look unfinished. Corners take more care than flat joints because two surfaces meet there, often in areas where light creates a sharp shadow.
Corner issues are worth addressing before paint. Once painted, a weak or uneven corner is harder to blend, and everyday bumps in a busy home, rental unit, or commercial space can make the defect more obvious.
Fastener pops, dimples, and exposed heads
Screws should be set just below the drywall surface and covered so they cannot be seen. Poor finishing may leave round dimples where fasteners were not filled smoothly, raised spots where a screw is sitting proud, or visible screw heads beneath paint.
A fastener pop looks like a small round bump or a cracked circle in the wall. It can happen when a screw shifts slightly or when the board moves against the framing. One isolated pop may be a straightforward repair. Several pops in the same area deserve a closer look before the surface is refinished, particularly in a new build or recently renovated room.
Patches that do not blend into the wall
Drywall repairs should disappear into the surrounding surface. A poor patch often has a raised border, a shallow depression in the middle, obvious sanding marks, or a different texture from the rest of the wall. Under paint, it may show up as a dull rectangle or a visible halo.
The size of the patch changes the approach. A small nail-hole repair requires little build-up, while a larger opening needs a stable backing, proper tape at the seams, and enough finishing area to make the transition disappear. Trying to keep a larger patch too small is one reason repaired areas remain visible.
Texture also matters. If the surrounding ceiling has a stipple or another texture, a smooth repair will be noticeable even when the joint itself is flat. Matching the existing surface takes planning and should be discussed before the repair is started.
Blisters, pinholes, and rough compound
Blisters or bubbles in the compound can indicate tape that did not bond well or compound that was applied over a surface that was not properly prepared. Pinholes are tiny craters left in the final coat. A few may be easy to fill, but many pinholes across a wall suggest the finish was rushed or the compound was not worked and sanded carefully.
Rough compound often appears around joints, corners, and patches where excess material was left behind. It may feel gritty, have sharp edges, or create a visibly different sheen after paint. Paint is not a levelling product. It adds colour and protection, but it will not correct rough drywall work underneath.
Why paint can make the problem look worse
People sometimes assume paint will hide minor drywall imperfections. In reality, paint often makes them easier to see. Primer can reveal missed sanding, uneven patches, and joint lines that were difficult to spot on bare drywall. Dark colours and finishes with more sheen are less forgiving than light, flat finishes.
That does not mean every room needs the same level of finish. A utility room, garage, or storage space may have different expectations than a main-floor living room, stairwell, or office. The expected lighting, wall colour, texture, and use of the room should all guide the finishing standard. A clear conversation before work begins helps prevent surprises later.
When to repair poor drywall finishing
The best time to correct finishing problems is before primer and paint, when seams, patches, and sanding issues are easier to assess and repair. If the room has already been painted, repairs are still possible, but the finished area will usually need to be primed and painted to blend with the surrounding wall.
For a small defect, such as a minor pinhole or one small ding, a touch-up may be enough. For visible seams, repeated fastener pops, loose tape, broad ripples, or a patch that catches light across the room, the repair typically needs more than a quick skim. The existing finish may need to be opened up, stabilized, retaped where necessary, coated in wider passes, sanded, and checked under proper lighting.
If you are unsure whether what you see is normal, look at the wall from the side rather than straight on. Check it in natural daylight and with the room lights on. Run a hand lightly over the area, but do not rely on touch alone. A finish can feel smooth and still show a clear defect once it is painted.
For homeowners and contractors in Owen Sound, Grey County, and Bruce County, a paint-ready drywall surface is usually the goal: joints that disappear, corners that read straight, repairs that blend in, and ceilings that hold up under changing light. Taking the time to address questionable areas before the final coat of paint is applied can save a room from becoming a collection of small distractions every time the lights come on.


